
The Booking and Events feature in PageUp may be used by hiring managers of active searches, or by employment coordinators assisting hiring managers with the search process.
Using this feature, the interview scheduler can select the date and time of the interview, or can invite the candidate to choose from multiple options.
Events created using the Booking and Events feature will be added to the applicant’s online calendar (e.g. Google Calendar, Outlook).
Creating an Interview Event and Allowing the Candidate(s) to Select a Time Slot
-
Log into Connect Lehigh
-
Select Employee
-
Select Page Up to access the PageUp People System
-
Click the Administration link that’s located under the blue Recruitment/Position Description heading
-
The Administration area of the system will open as a tiled dashboard in a new window
-
-
Click the Hamburger menu (displayed as ≡) in the upper left corner
-
Select New Event (under Events heading)
-
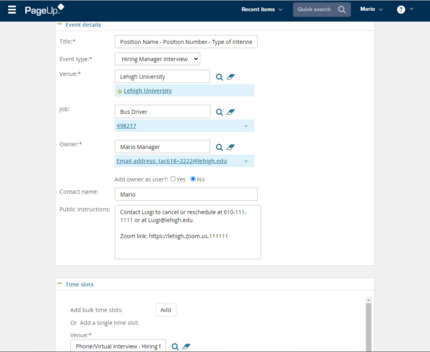
Enter the Event Title
-
This should be: (Position Name - Position Number - Type of Interview)
For example: (Human Resources Associate - S87700 - Phone/Zoom Interview)
-
-
Choose Event Type
-
Select 1st, 2nd, or 3rd round interview based upon your point in the hiring process.
-
-
Click the magnifying glass to the right of the Venue field
-
Select Lehigh University
-
Click Okay
-
Click the magnifying glass to the right of the Job field
-
Click the appropriate job to highlight it
-
Click Okay
-
If Owner is not pre-populated with the correct name, type the name and hit Enter. The owner is the person responsible for the coordination of the event. This can be the hiring manager or someone else.
-
Toggle the radio button to "Yes" where it says "Add owner as user" - this allows the person listed as the owner to recieve email updates when candidates book time slots.
-
Enter the "contact name" which should be the same name as the owner.
-
Provide necessary details for the applicant in the public instructions box
This should include:-
Who the applicant should contact if they need to cancel or reschedule (name, email, phone number)
-
Campus address and directions (if interviewing in person)
-
A Zoom link (for virtual interviews)
-
The Zoom link added here will attach to all events
-
The same Zoom link can be used for all interviews or individual events can be created for each interview
-
If using the same Zoom link for all interviews, enable the Waiting Room feature so interviews are not interrupted
-
Using a different Zoom link for each interview will require creating multiple events in PageUp (repeating this process multiple times to create new events with different Zoom links)
-
-
-
-
Click Save
-
Scroll to the Time slots section
-
Click the Add button (next to Add bulk time slots )
-
Ensure the venue is Lehigh University
-
If it isn’t
-
Click the magnifying glass the the right of the venue
-
Select Lehigh University
-
-
-
Select the interview date range to provide to the applicants
-
Select the days of the week that match the time frame chosen
-
Enter interview time slots according to the interviewer’s availability
-
Note: If the interviewer is available at different times on different days, times can be edited later*
-
-
Enter the number of positions for which you are interviewing into the Positions field.
-
Ensure the active field is set to "Yes"
-
Click Add
-
If a time slot conflict notification appears, click Yes to proceed
-
Selected time slots will display in the list
-
*To edit a time slot, click the Edit link to the right of the time slot and update as appropriate
-
Scroll to the bottom of the page
-
Click Save and Exit
-
Click Jobs (in the top blue bar)
-
Click the blue linked title of the position
-
Click View Applications (in the upper right hand corner)
-
Click the blue linked status of the candidate you wish to interview
-
Choose one of the following:
-
1st round interview booking
-
2nd round interview booking
-
3rd round interview booking
-
-
Click Next
-
Click the magnifying glass to the right of the Event field
-
Check the box that says Only show my event
-
Click Search
-
Click the Event to highlight it
-
Click OK
-
Scroll to the bottom of the window
-
As you scroll down you will see the email template that will be sent to the applicant
-
-
Click Move Now
-
The change in applicant status will be reflected in the candidate pool. The email has prompted the candidate to log into their applicant account and select one of the time slots that you created.
-
The event owner will receive an email confirmation.
-
The applicant pool will update to 1st, 2nd, or 3rd interview accepted depending on the event type you selected when setting up the event.
-
Additional information on adding post-interview notes is available in the Adding Interview & Reference Notes user guide.
Creating an Interview Event for a Predetermined Date and Time
-
Log into Connect Lehigh
-
Select Employee
-
Select Page Up to access the PageUp People System
-
Click the Administration link that’s located under the blue Recruitment/Position Description heading
-
The Administration area of the system will open as a tiled dashboard in a new window
-
-
Click the Hamburger menu (displayed as ≡) in the upper left corner
-
Select New Event (under Events heading)
-
Enter the Event Title
-
This should be: (Position Name - Position Number - Type of Interview)
For example: (Human Resources Associate - S87700 - Phone/Zoom Interview)
-
-
Choose Event Type
-
Select 1st, 2nd, or 3rd round interview
-
-
Click the magnifying glass to the right of the Venue field
-
Select Lehigh University
-
Click Okay
-
Click the magnifying glass to the right of the Job field
-
Click the appropriate job to highlight it
- Click Okay
-
If Owner is not pre-populated with the correct name, type the name and hit Enter. The owner is the person responsible for the coordination of the event. This can be the hiring manager or someone else.
-
Toggle the radio button to "Yes" where it says "Add owner as user" - This allows the person listed as the owner to recieve email updates when candidates book time slots.
-
Enter the "contact name" which should be the same name as the owner.
-
Provide necessary details for the applicant in the Public Instructions box
This should include:-
Who the applicant should contact if they need to cancel or reschedule (name, email, phone number)
-
Campus address and directions (if interviewing in person)
-
A Zoom link (for virtual interviews)
-
The Zoom link added here will attach to all events
-
The same Zoom link can be used for all interviews or individual events can be created for each interview
-
If using the same Zoom link for all interviews, enable the Waiting Room feature so interviews are not interrupted
-
Using a different Zoom link for each interview will require creating multiple events in PageUp (repeating this process multiple times to create new events with different Zoom links)
-
-
-
-
Click Save
-
Scroll to the Time Slots section
-
Click the magnifying glass to the right of the Venue field
-
Select Lehigh University
-
Click Okay
-
Select the date and time for the event
-
Enter the number of positions you are interviewing in the Positions field (typically this is 1)
-
Click Add
- Scroll to the bottom and click Save and Exit
-
Click Jobs (in the top blue bar)
-
Click the blue linked title of the position
-
Click View Applications (in the upper right hand corner)
-
Click the blue linked status of the candidate you wish to interview
-
Choose one of the following:
-
1st round interview booking
-
2nd round interview booking
-
3rd round interview booking
-
-
Click Next
-
Click the magnifying glass to the right of the Event field
-
Check the box that says Only Show my Event
-
Click Search
-
Click the event to highlight it
-
Click Okay
-
Scroll to the bottom of the window
-
As you scroll down, you will see the email template that will be sent to the applicant
-
-
Click Move Now
-
The change in applicant status will be reflected in the candidate pool. The email has prompted the candidate to log into their applicant account and select one of the time slots that you created.
-
The hiring manager will receive an email confirmation
-
The applicant’s status in the applicant pool will update to 1st, 2nd, or 3rd interview accepted.
-
Additional information on adding post-interview notes is available in the Adding Interview and Reference Notes user guide.